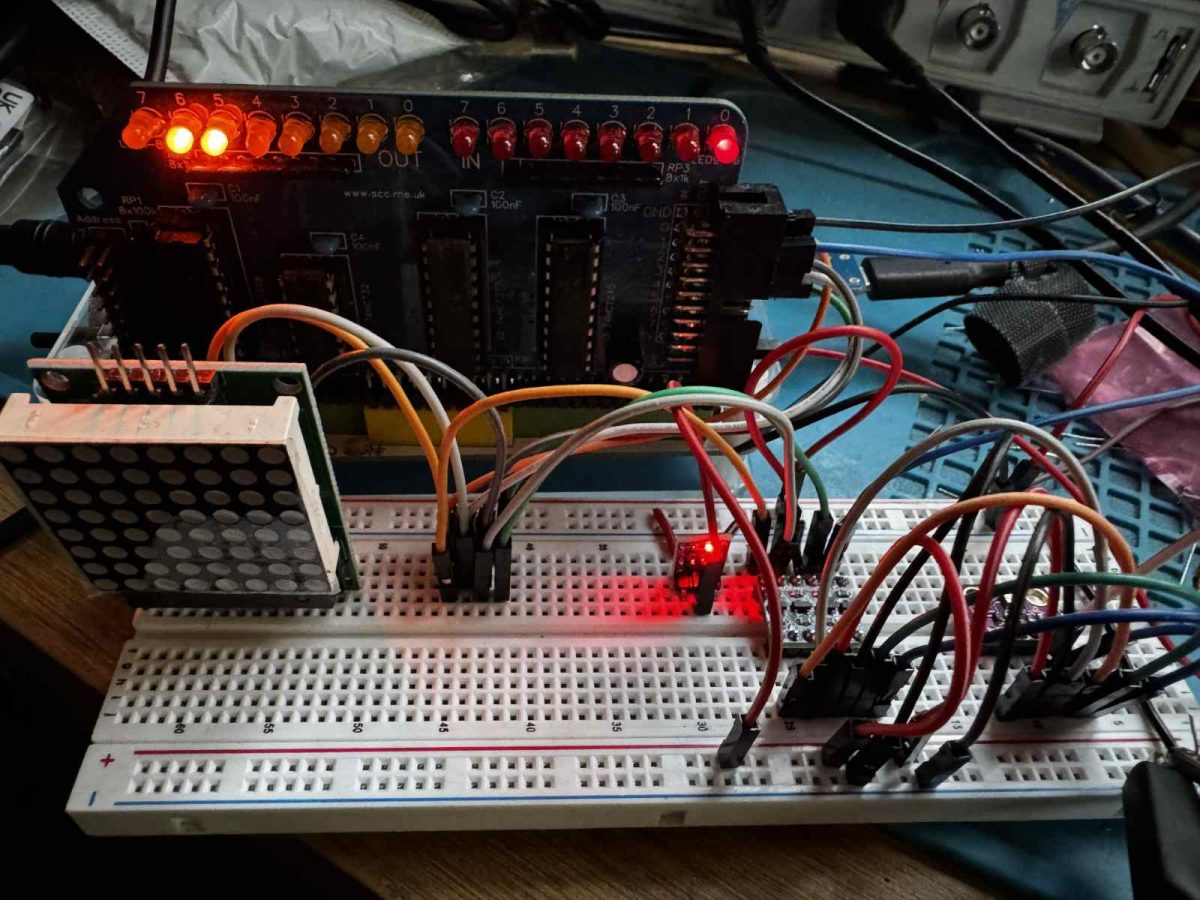
In previous posts, I’ve been able to read the temperature and humidity using a BME280 sensor attached to my RC2014 computer. The BME280 has one other reading it can provide, and that is atmospheric pressure.
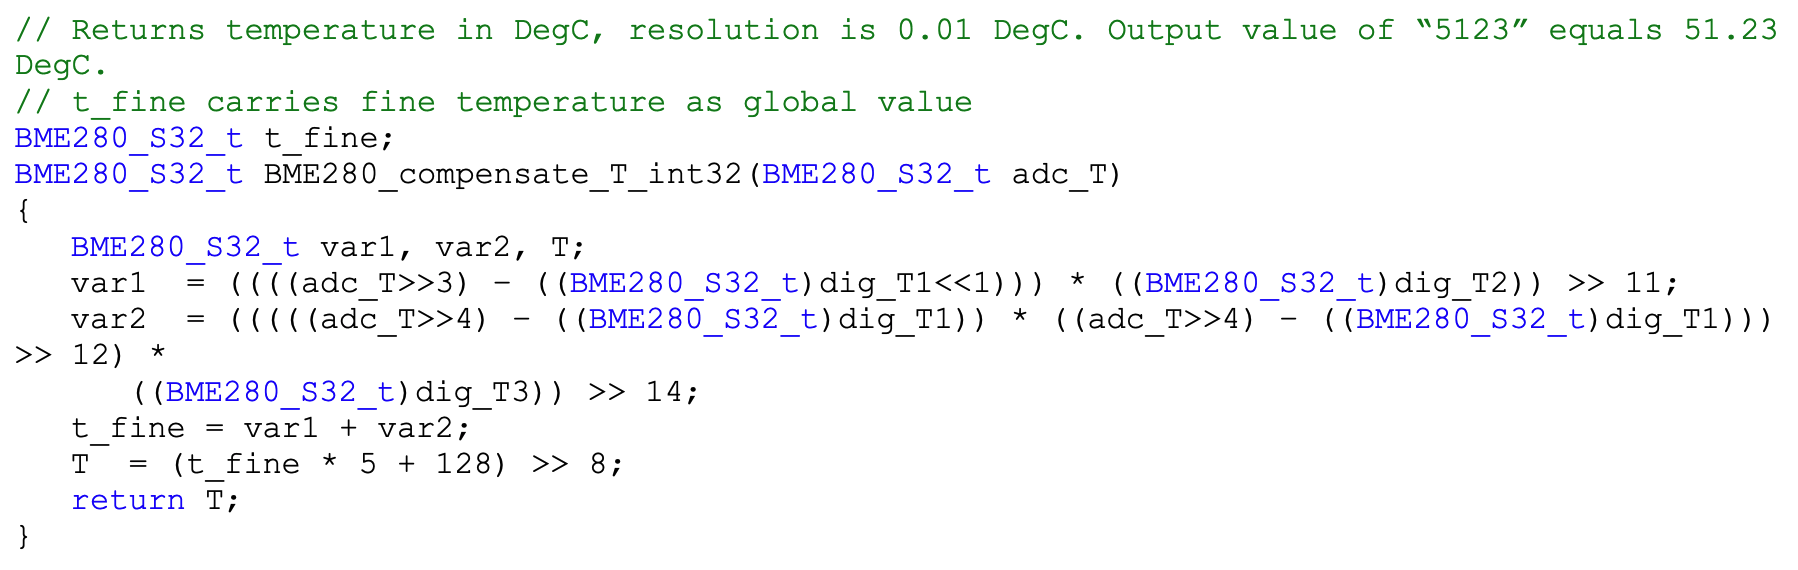
As with the temperature and humidity, I need to calculate the value using the calibration data stored in the BME280. I also need the value of t_fine I stored when calculating the temperature. My previous post showed how to get these values. The BME280 datasheet gives me the algorithm and example code to calculate the air pressure.
The BME280 can also provide readings for humidity and atmospheric pressure. In this post, I’m going to look at reading humidity.
The BME280 provides the humidity value as a 24bit integer. I can use the read24 function I defined in my last post to read this value from the BME280. However, I can’t use it directly. Like the temperature reading, I have to do some calculations using the calibration data from the BME280. Thankfully, the BME280 datasheet gives me an algorithm to do this on page 25, so I just need to tweak this to drop in the relevant values.
That was really simple because most of the hard work had already been done in my previous post. The readHumidity function looks complex, but it’s just the example code from the datasheet tweaked to use my variables.
In my previous posts, I’ve shown how to read the ID value from a BME280 sensor using an RC2014 computer. That’s not very useful in itself, but it is a good building block for getting practical information from the sensor. In this post, I’m going to read the current temperature.
The temperature isn’t returned as a sensible, human-understandable value directly from the sensor. It needs to be calculated using calibration data that the BME280 also supplies. The BME280 datasheet gives us an algorithm to do this.
I also need to tell the BME280 to continually sense; otherwise, it is in sleep mode.
The BME280 is a very well-known sensor, and there are some libraries written for other systems that I can use to verify my work. Adafruit has a BME280 library for the Arduino that is written in C++. I am going to use some of the code from the Adafruit library where possible.
Writing and reading data
My previous post had a transfer routine to handle the bit-banging of SPI data, so I am going to build upon this.
The first routine we need is one to send and receive data of different lengths. I pass in address locations and lengths. The routine will then bit-bang that amount of data.
void write_then_read(const uint8_t *write_data, uint8_t write_length, uint8_t *read_data, uint8_t read_length) {
    // Deselect the BME280 to ensure it's not selected before starting communication.
    io_spi = SELECT | CLK | MOSI;

    // Write data
    for (uint8_t i = 0; i < write_length; i++) {
        transfer(write_data[i]);
    }

    // Read data
    for (uint8_t i = 0; i < read_length; i++) {
        read_data[i] = transfer(0x00); // Send dummy byte to read
    }

    // Deselect the BME280 after communication is done.
    io_spi = SELECT | CLK | MOSI;
}
I need to be able to read in 8 bit, 16 bit, and 24 bit values in little-endian format, both signed and unsigned, as well as to be able to write an 8 bit value. These utility routines can help with that.
The BME280 has numerous registers we can read and write to. The ID we retrieve in the previous blog post uses register 0xd0. Adafruit has defined all of these in their library, so I will reuse their code for this.
The BME280 doesn’t do much unless it’s told to. So we need a routine to turn it on and get it sampling data. There are various configurations defined in the BME280 documentation, but I’m going to lift these values from the Adafruit library, as they have done the hard work of turning them into enum values already.
To set the sampling rate, I need to perform several operations. I first put the BME280 to sleep. This allows me to safely update the configuration and control registers.
void setSampling(enum sensor_mode mode, enum sensor_filter filter, enum standby_duration duration) {
    // Set the sensor to sleep mode before changing settings
    write8(BME280_REGISTER_CONTROL, MODE_SLEEP);

    // Set the humidity oversampling to x1 (0b001)
    write8(BME280_REGISTER_CONTROLHUMID, 0b001);

    // Set the filter and standby duration in the config register
    uint8_t config = (duration << 5) | (filter << 2);
    write8(BME280_REGISTER_CONFIG, config);

    // Set the temperature and pressure oversampling to x1 (0b001)
    // and the mode
    uint8_t control = (0b001 << 5) | (0b001 << 2) | mode;
    write8(BME280_REGISTER_CONTROL, control);
}
Reading the calibration coefficients
I mentioned earlier the need to use calibration data to calculate the temperature. We need to get these values and store them.
typedef struct {
  uint16_t dig_T1; ///< temperature compensation value
  int16_t dig_T2;  ///< temperature compensation value
  int16_t dig_T3;  ///< temperature compensation value

  uint16_t dig_P1; ///< pressure compensation value
  int16_t dig_P2;  ///< pressure compensation value
  int16_t dig_P3;  ///< pressure compensation value
  int16_t dig_P4;  ///< pressure compensation value
  int16_t dig_P5;  ///< pressure compensation value
  int16_t dig_P6;  ///< pressure compensation value
  int16_t dig_P7;  ///< pressure compensation value
  int16_t dig_P8;  ///< pressure compensation value
  int16_t dig_P9;  ///< pressure compensation value

  uint8_t dig_H1; ///< humidity compensation value
  int16_t dig_H2; ///< humidity compensation value
  uint8_t dig_H3; ///< humidity compensation value
  int16_t dig_H4; ///< humidity compensation value
  int16_t dig_H5; ///< humidity compensation value
  int8_t dig_H6;  ///< humidity compensation value
} bme280_calib_data;

bme280_calib_data _bme280_calib;
The calibration data is a mix of signed and unsigned integers of various lengths. I can use the various read functions I defined earlier to read and save these.
The example code given in the BME280 datasheet returned the temperature as an integer, but for ease of use, I will want to use a floating-point value. This is simply the value from the datasheet divided by 100 to give us a value in Celsius. This routine makes extensive use of the calibration data from the BME280.
I have enough code to be able to read the temperature from the BME280, so it’s time to put it all together.
The first thing I need to do is reset the BME280. I can do this by writing to the soft reset register. Secondly, I turn on the BME280 and get it sampling. Next, I read the calibration data. Finally, in a loop, I can continually read the temperature and display it to my serial terminal.
int main(void) {
    write8(BME280_REGISTER_SOFTRESET, 0xB6);

    setSampling(MODE_NORMAL, FILTER_OFF, SAMPLING_X16);

    readCoefficients();

    while(1) {
      float temperature = readTemperature();
      printf("Temperature: %.2f°C\n", temperature);
    }
}
Compiling the code
Because I am using floating-point numbers, I need to include the maths library when compiling. I do this using the -lm flag.
The printf command doesn’t handle floating-point numbers by default, so I also need to enable this. This is done using a C pragma.
#pragma printf %f
When I compile the application using z88dk zcc, my command line looks like this.
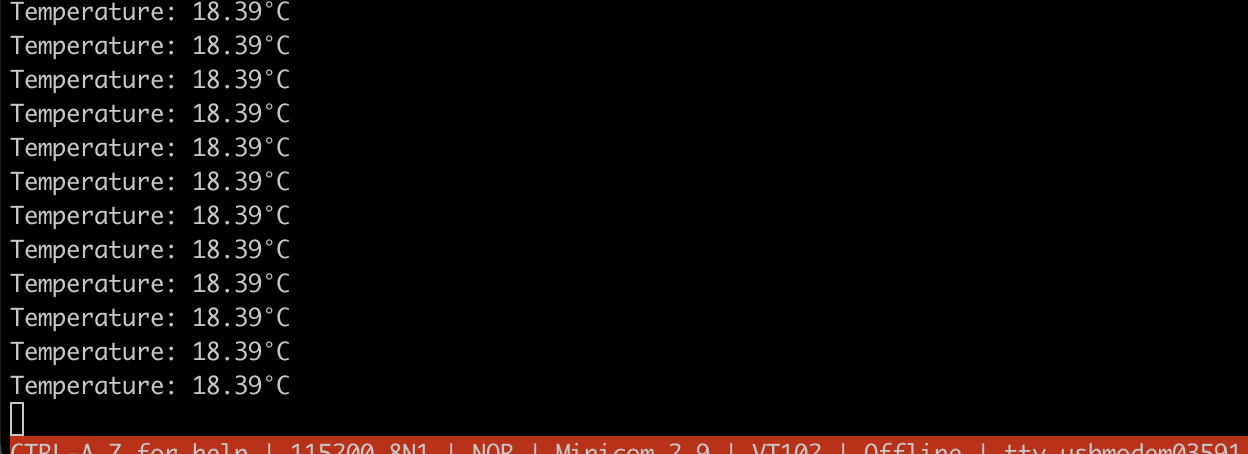
It was very satisfying to see real temperatures on screen when I ran the code. The thermostat in my room was set to 18C, so this seems to be working really well.
In my previous post, I showed how to read the ID register on the BME280 by bit-banging the SPI protocol using Z80 assembly language. I want to be able to read the temperature using the BME280, but this requires the use of floating-point maths to convert the values returned from the device to a value in degrees Celsius. I think this would be a bit too complex to do using Z80 assembly language, so I plan to switch to using C instead.
I have previously written about using the z88dk C compiler with an RC2014, so I won’t fully go over this again. I will rewrite the previous assembly language code to get the ID of the BME280 device and display it on the LEDs.
Pragmas
I need to set a couple of pragma’s in the C code to tell the compiler where to assemble the code and where to set the stack pointer. The assembly language program ran from address 0x9000, so I will do the same here. I will also set the stack pointer to 0xFC00.
To use the Z80’s IO ports from C, I need to use a special function register. The C compiler z88dk uses has a special instruction called __sfr __at that declares a variable at a specific IO port. This variable can then be read from or assigned, and this maps to Z80 in and out instructions. I’m going to be using IO port 0x01 again.
Sending and receiving a byte of data takes place in parallel, so I’m going to create a C function that takes a byte as a parameter and also returns a byte.
First, I need to include stdint.h to get the required data type of uint8_t. I also need to define the bit masks for MOSI, MISO, CLK, and SELECT.
// Send a byte and receive a byte from the BME280 over SPI.
uint8_t transfer(uint8_t value) {
    uint8_t received_value = 0;
    for (int i = 0; i < 8; i++) {
        // Set the MOSI line based on the current bit of the value to send,
        // then det the CLK line low.
        if (value & 0x80) {
            io_spi = 0 &~SELECT &~CLK | MOSI; // Set MOSI high and CLK low.
        } else {
            io_spi = 0 &~SELECT &~CLK; // Set MOSI low and CLK low.
        }

        // Read the MISO line to get the received bit.
        uint8_t miso = io_spi & MISO; // Read MISO

        // Shift the received value left and add the new bit.
        received_value = (received_value << 1) | (miso ? 1 : 0);

        // Pulse the clock line high.
        if (value & 0x80) {
            io_spi = 0 &~SELECT | CLK | MOSI; // Set MOSI high and CLK high.
        } else {
            io_spi = 0 &~SELECT | CLK; // Set MOSI low and CLK high.
        }

        // Prepare for the next bit by shifting the value to send left
        value <<= 1;
    }
    return received_value;
}
Reading the ID byte and displaying the result
Now I have a function that can send and receive a byte; I can request the ID byte.
Firstly, I need to make sure the device isn’t selected. Next, I need to request the ID by sending the command 0xD0, then read the returned byte. I need to send a dummy value when reading the returned byte, so I will use 0x00 in this case. Finally, I deselect the BME280 and show the values on the LEDs, as with the assembly language version.
int main(void) {
    io_spi = SELECT | CLK | MOSI; // Deselect the BME280
    transfer(0xD0);               // send the address for the ID register.
    uint8_t id = transfer(0x00);  // Read the ID register.
    io_spi = SELECT | CLK | MOSI; // Deselect the BME280.

    io_spi = id;                  // display the ID value on the output port
    return 0;
}
I previously controlled a MAX7219 LED matrix over SPI from my RC2014 computer. Now I want to try another SPI device, the BM280 environmental sensor from Bosch. The code in this article builds on the previous work, so take a moment to read it if you haven’t already.
The BME280 can read temperature, pressure, and humidity. It is a 3.3V device, so I will need a voltage level converter to use it with a 5V RC2014.
The SPI communication will also need to be two-way, as I will need to tell the sensor what values to send me.
I used the following parts (note: Amazon affiliate links)
The regulator allowed me to generate a 3.3v power supply from the RC2014’s 5v supply. I was then able to use this on the low-voltage side of the level shifter to allow the signals to convert between 5v and 3.3v.
As before, I am using the SC129 Digital IO module on my RC2014 to bit-bang the SPI protocol. This is wired up via the level shifters and 3.3V regulator as follows…
SC129
BME280
GND
GND
5V
3.3V (via 3.3 regulator)
OUT D0
SDA / SDI (via level shifter)
OUT D1
SCL / SCK (via level shifter)
OUT D3
CSB (via level shifter)
IN D0
SDO (via level shifter)
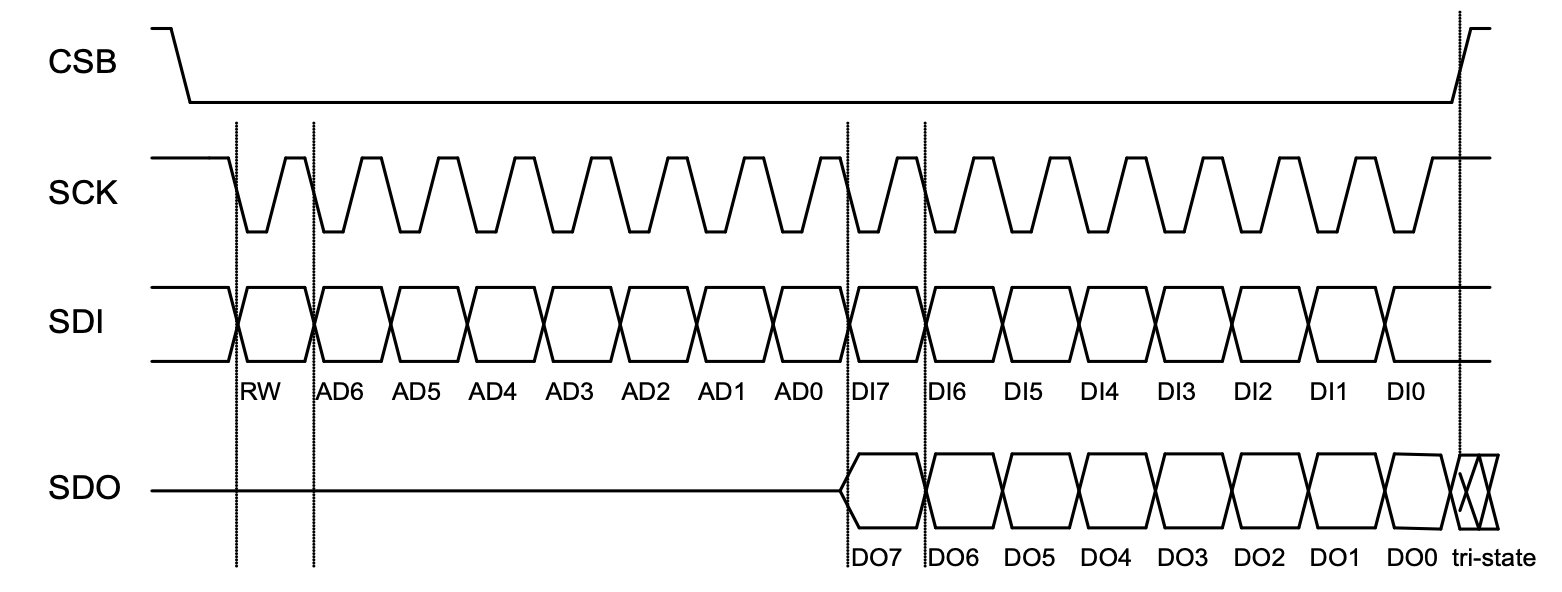
The BME280 gives us the following timing diagram for SPI communication.
Looking at the timing diagram, we can see that before we start any communication, the SCL / SCK and CSB lines both need to be high. We can use a subroutine to do this.
deselect_bme280:
    ld a, 0 | SELECT | CLK | MOSI
    out (OUTPUT_PORT),a
    ret
Sending and receiving take place on the transition of the SCK line from high to low.
This code is similar to the code for the LED matrix in my earlier post. I have added some additional code to handle the input. This reads the bit, rotates it right into the carry flag, then rotates that value into the E register. By the end of the routine, the byte in register D will have been sent, and the byte returned will be in register E.
send_receive_byte:
    push bc
    ld b, 8
    ld a, 0 &~SELECT &~CLK | MOSI
    rra
    ld c, a
.transmit_bme280_bit:
    ld a, c
    rl d
    rla
    out (OUTPUT_PORT), a.  ; CLK low
    in a, (INPUT_PORT)
    rra
    rl e
    ld a, c
    or a, CLK
    out (OUTPUT_PORT), a   ; CLK high
    djnz .transmit_bme280_bit
    pop bc
    ret
To test that this is working, we can send the value 0xD0 to the BME280. It should send back the value 0x60. To read the returned byte, we send 0x00. While this is being sent, the result byte will be returned simultaneously. We will then output this byte to the SC129 so the display LEDs will show the returned value in binary.
bme280_getId:
    call deselect_bme280
    ld d, 0xD0
    call send_receive_byte
    ld d, 0x00
    call send_receive_byte
    call deselect_bme280

    ld a, e
    out (OUTPUT_PORT), a
    ret
After running, the LEDs correctly show 01100000 – 0x60.
The next step will be to get actual temperature readings. That will be the subject of the next post.
In 1981, Sinclair Research introduced the ZX Printer. This was a small printer that connected to their ZX81 computer. It used special paper with an aluminium coating that could be burnt off by a passing print head. Sinclair’s later ZX Spectrum computer was also compatible with the ZX Printer.
A compatible printer called the Alphacom 32 / Timex Sinclair 2040 was also released. This used standard thermal paper. It used an external power supply instead of relying on that of the ZX81 or ZX Spectrum.
Both the ZX81 and ZX Spectrum are Z80-based, and so is the RC2014 computer. So I wondered if the RC2014 could use a ZX Printer? The belt inside my ZX Printer has perished and no longer works. I do have a working Alphacom 32 printer. Researching how I could interface the two devices, I found that Spencer Owen had already attempted this. He was able to get some output on the printer, but nothing usable.
The ZX Printer uses the following lines from the Z80 microprocessor.
A2 – LOW when addressing the printer.
IORQ – LOW when addressing the printer.
RD – LOW when reading
WR – LOW when writing
D0 – HIGH when reading if the printer is ready for the next data bit
D1 – Write HIGH to slow the motor. Write LOW for a faster motor speed.
D2 – Write HIGH to stop the motor, write LOW to start the motor.
D6 – LOW when reading if the printer is present.
D7 – HIGH when reading if it’s the start of a new line. Write HIGH to print a bit.
A7 – HIGH on the Alphacom 32 / Timex Sinclair 2040 when addressing the printer. The ZX Printer ignores this.
The printer also uses GND and +5V. The ZX Printer also uses +9V on the ZX81 and ZX Spectrum edge connector. The Alphacom 32 / Timex Sinclair 2040 doesn’t use +9V.
As decoding on just A2 would mean the printer showing on many addresses, I decided to use a 74HCT688 to decode A0 to A7 instead. This means I can avoid IO address clashes with other RC2014 modules. I decided to make this configurable via DIP switches to make it easy to move IO addresses. I send the output from the 74HCT688 to A2 on the printer. I wired A7 to +5V as I no longer need to decode this. I pass the other lines from the RC2014 to a ZX Spectrum compatible edge connector.
As the RC2014 doesn’t have a +9V power supply, I added a barrel socket for an external supply. I wired this to be center negative so I could use a ZX Spectrum power supply. As I don’t have a working ZX Printer, I’ve not been able to test this part of the circuit yet. The markings on the PCB are from the footprint, and these are the wrong way round.
Example Z80 Assembly Language
I set the DIP switches on my board to port $1. I also have an RC2014 Digital IO module on port $0. In my assembly language program, I use this to show the current line being printed, but this is optional.
The ZX Printer’s resolution is 256 pixels wide, so for this example, I converted the RC2014 logo to 256 pixels wide. This gave me a height of 42 lines for the image. The image I converted from didn’t scale very well, so it’s a bit of messy print.
I based my code on the printer routines in the ZX Spectrum ROM. The COPY command on a Spectrum prints out the current contents of the screen. I used this as my starting point, and modified the code to see a bitmap instead.
As timing is important, I have disabled interrupts while the code runs.
	OUTPUT zxprinter.z80

; Assemble using SjASMPlus.
;
; This program will print a bitmap image to a ZX printer.
; This code is based off code in the ZX Spectrum ROM.
; https://skoolkid.github.io/rom/asm/0ECD.html
;
; Robert Price - www.robertprice.co.uk

;        DEFINE+ UseDIO         ; Uncomment this line to use the Digital
                                ; IO board to show the current line being
                                ; printed.

PORT    EQU $1                  ; The output port to use for the printer.

        IFDEF UseDIO
DIOPORT EQU $0                  ; the output port for a RC2014 digial IO
                                ; board. This is used to show the current
                                ; line being printed.
        ENDIF

WIDTH   EQU 256                 ; the width of the image in pixels.
HEIGHT  EQU 42                  ; how many lines in the image to print.


        ORG $9000               ; The start of the program. This is where
                                ; the program will be loaded into memory.

        di                      ; disable interrupts

        ld b, HEIGHT            ; the number of lines to print is in B.
        ld hl, Buffer           ; The address of the bitmap stored in HL

Copy_Buffer:
        push bc
        call Copy_Line          ; print the current line
        pop bc

        IFDEF UseDIO
        ld a, b                 ; show the current line being printed on
                                ; the Digital IO LEDs.
        out (DIOPORT), a
        ENDIF

        djnz Copy_Buffer        ; loop back to print the next line.

        IFDEF UseDIO
        ld a, 0                 ; turn off the Digital IO LEDs
        out (DIOPORT), a
        ENDIF

Copy_End:
        ld a, $04               ; Bit 2 high stops the printer
        out (PORT), a           ; stop the printer

        ei                      ; enable interrupts

        ret                     ; end the program


Copy_Line:
        ld a, b                 ; Copy the pixel-line number.
        cp $03                  ; The A register will hold 0 until the
                                ; last two lines are being handled.
        sbc a, a
        and $02
        out (PORT), a           ; slow the motor for the last two lines.
        ld d, a                 ; the D register will hold either 0 or 2.

Copy_L_1;
                                ; on a ZX Spectrum this would test for
                                ; breaks and stop the printer.
                                ; let's add our own delay here to allow
                                ; the printer to catch up.
        push bc
        ld b, $ff
.delay:
        nop
        djnz .delay
        pop bc

Copy_L_2:
        in a, (PORT)            ; fetch the status of the printer.
        add a, a                ; double the value of A. This moves bit 6
                                ; which is the printer present flag to bit
                                ; 7 and the sign flag.
        ret m                   ; make an immediate return if the printer
                                ; is not present. (sign negative flag)

        jr nc, Copy_L_1         ; wait for the stylus to be ready.
        ld c, $20               ; there are 32 bytes.

Copy_L_3:
        ld e, (hl)              ; fetch a byte from the buffer.
        inc hl                  ; update the pointer
        ld b, $08               ; eight bits per byte

Copy_L_4:
        rl d                    ; move D left
        rl e                    ; move each bit into the carry
        rr d                    ; move D back again, picking up the carry
                                ; from E. The carry bit was the bit to print.

Copy_L_5:
        in a, (PORT)            ; fetch the status of the printer
        rra                     ; move bit 0 into the carry flag.
                                ; If bit 0 is high,
                                ; the printer is ready to receive data.
        jr nc, Copy_L_5         ; loop until the printer is ready

        ld a, d                 ; load the byte to send to the printer.
                                ; Bit 2 low starts the motor,
                                ; bit 1 high slows the motor,
                                ; bit 7 high prints
        out (PORT), a           ; send to the printer
        djnz Copy_L_4           ; print each bit.
        dec c                   ; decreate the line byte counter
        jr nz, Copy_L_3         ; loop until all 32 bytes are printed.
        ret

; The image we want to print
; In this case, it's the RC2014 logo at 256 pixels wide and 42 pixles high.
Buffer:
        dc $00, $00, $00, $00, $82, $00, $00, $00, $00, $00, $00, $00, $00, $00, $00, $00
        dc $00, $00, $00, $00, $82, $00, $00, $00, $00, $00, $00, $00, $00, $00, $00, $00
        dc $00, $00, $00, $00, $82, $00, $00, $00, $00, $00, $00, $00, $00, $00, $00, $00
        dc $00, $04, $10, $43, $08, $20, $00, $02, $08, $20, $82, $00, $00, $01, $04, $10
        dc $40, $00, $04, $10, $c2, $08, $00, $00, $02, $08, $00, $00, $06, $18, $01, $04
        dc $00, $04, $10, $c2, $08, $30, $00, $02, $08, $20, $06, $00, $00, $41, $04, $10
        dc $00, $00, $00, $00, $00, $00, $00, $00, $00, $00, $00, $00, $00, $00, $00, $10
        dc $60, $00, $04, $30, $82, $0c, $00, $00, $02, $0c, $00, $00, $04, $18, $01, $06
        dc $00, $04, $30, $82, $08, $30, $00, $02, $08, $01, $06, $00, $00, $41, $04, $10
        dc $c0, $00, $08, $20, $82, $0c, $00, $00, $06, $1c, $00, $00, $04, $18, $00, $06
        dc $00, $0c, $30, $c6, $18, $70, $00, $06, $18, $61, $86, $00, $00, $c3, $0c, $30
        dc $c0, $00, $0c, $31, $86, $1c, $00, $00, $06, $18, $00, $00, $0c, $38, $03, $0c
        dc $00, $ff, $ff, $ff, $ff, $f0, $00, $7f, $ff, $ff, $fe, $00, $0f, $ff, $ff, $ff
        dc $c0, $00, $ff, $ff, $ff, $fc, $00, $00, $7f, $f8, $00, $00, $7f, $f8, $3f, $fc
        dc $00, $08, $37, $df, $70, $40, $00, $06, $fb, $ef, $0c, $20, $00, $df, $7d, $e0
        dc $84, $00, $0d, $f7, $84, $10, $00, $00, $04, $18, $00, $00, $08, $30, $02, $0c
        dc $00, $08, $20, $00, $00, $41, $01, $04, $00, $00, $08, $30, $20, $c0, $00, $01
        dc $86, $02, $18, $00, $04, $10, $40, $01, $04, $10, $00, $00, $08, $30, $02, $08
        dc $00, $18, $70, $00, $00, $41, $81, $06, $00, $00, $08, $30, $20, $c0, $00, $01
        dc $07, $06, $18, $00, $04, $10, $60, $01, $08, $30, $00, $00, $08, $30, $00, $18
        dc $00, $10, $60, $00, $00, $43, $01, $06, $00, $00, $08, $30, $20, $c0, $00, $01
        dc $06, $04, $18, $00, $04, $00, $c0, $02, $08, $30, $00, $00, $08, $30, $04, $18
        dc $00, $38, $e0, $00, $00, $c3, $03, $1c, $00, $00, $1c, $70, $71, $c0, $00, $23
        dc $8e, $06, $38, $00, $0c, $71, $c0, $07, $1c, $70, $00, $00, $1c, $70, $0e, $38
        dc $01, $ff, $e0, $00, $0f, $ff, $3f, $fc, $00, $00, $ff, $e3, $ff, $80, $00, $1f
        dc $fe, $7f, $f8, $00, $7f, $ff, $c0, $3f, $ff, $f0, $00, $01, $ff, $e0, $7f, $f8
        dc $00, $10, $40, $00, $00, $82, $02, $0c, $00, $00, $00, $00, $00, $00, $00, $c3
        dc $00, $0c, $30, $02, $08, $20, $80, $02, $00, $60, $00, $00, $18, $00, $04, $10
        dc $00, $00, $c0, $00, $00, $82, $02, $08, $00, $00, $00, $00, $00, $00, $00, $c3
        dc $00, $0c, $30, $03, $00, $00, $80, $00, $10, $60, $00, $04, $18, $00, $08, $30
        dc $00, $20, $c0, $00, $00, $06, $00, $18, $00, $00, $00, $00, $00, $00, $00, $83
        dc $00, $08, $30, $03, $00, $41, $80, $00, $10, $60, $00, $04, $18, $00, $08, $30
        dc $00, $20, $c0, $00, $01, $06, $04, $18, $00, $00, $00, $00, $00, $00, $00, $83
        dc $00, $08, $30, $03, $00, $41, $80, $00, $10, $60, $00, $04, $18, $00, $08, $30
        dc $03, $ff, $c0, $00, $0f, $fe, $3f, $f8, $00, $00, $00, $00, $00, $00, $0f, $ff
        dc $00, $ff, $f0, $7e, $07, $ff, $80, $01, $ff, $e0, $00, $7f, $f0, $00, $ff, $f0
        dc $00, $61, $80, $00, $03, $fe, $0e, $38, $00, $00, $00, $00, $00, $00, $01, $ff
        dc $00, $18, $70, $0e, $00, $c3, $80, $00, $30, $c0, $00, $1c, $70, $00, $18, $70
        dc $00, $41, $04, $10, $41, $00, $04, $30, $00, $00, $00, $00, $02, $08, $21, $80
        dc $00, $10, $60, $04, $00, $03, $00, $00, $20, $c0, $00, $08, $20, $00, $10, $60
        dc $00, $41, $04, $10, $43, $00, $00, $30, $00, $00, $00, $00, $06, $18, $41, $80
        dc $00, $10, $60, $06, $00, $83, $00, $00, $20, $c0, $00, $08, $30, $00, $10, $60
        dc $00, $41, $04, $10, $83, $00, $08, $30, $00, $00, $00, $00, $06, $10, $41, $80
        dc $00, $10, $60, $0e, $00, $83, $00, $00, $20, $c0, $00, $00, $60, $00, $10, $60
        dc $00, $41, $0c, $30, $83, $00, $08, $30, $00, $00, $00, $00, $04, $10, $41, $80
        dc $00, $10, $60, $0c, $00, $83, $00, $00, $21, $c0, $00, $18, $60, $00, $10, $e0
        dc $0f, $ff, $ff, $ff, $ff, $00, $ff, $f0, $00, $00, $00, $00, $7f, $ff, $ff, $80
        dc $03, $ff, $c0, $fc, $1f, $ff, $00, $07, $ff, $80, $01, $ff, $e0, $03, $ff, $e0
        dc $00, $c3, $ff, $ff, $86, $00, $18, $70, $00, $00, $00, $00, $0e, $fb, $ff, $00
        dc $00, $20, $c0, $0c, $01, $86, $00, $00, $61, $80, $00, $10, $c0, $00, $30, $80
        dc $00, $83, $00, $00, $04, $10, $10, $60, $00, $00, $00, $01, $04, $00, $00, $00
        dc $00, $20, $80, $08, $01, $06, $00, $00, $41, $00, $00, $10, $42, $08, $20, $82
        dc $00, $83, $00, $00, $04, $18, $10, $60, $00, $00, $00, $03, $0e, $00, $00, $00
        dc $00, $20, $c0, $18, $01, $06, $00, $00, $41, $80, $00, $30, $82, $08, $20, $83
        dc $00, $83, $00, $00, $04, $18, $10, $60, $00, $00, $00, $02, $0c, $00, $00, $00
        dc $00, $00, $c0, $18, $01, $06, $00, $00, $c3, $80, $00, $20, $82, $08, $20, $03
        dc $01, $86, $00, $00, $0c, $38, $10, $e0, $00, $00, $00, $02, $0c, $00, $00, $00
        dc $00, $41, $80, $18, $03, $0e, $00, $00, $c3, $00, $00, $20, $82, $18, $61, $86
        dc $1f, $fe, $00, $00, $ff, $fb, $ff, $e0, $00, $00, $00, $3f, $fc, $00, $00, $00
        dc $07, $ff, $81, $f8, $3f, $fc, $00, $0f, $ff, $00, $03, $ff, $ff, $ff, $ff, $fe
        dc $01, $06, $00, $00, $08, $30, $30, $c0, $00, $00, $00, $06, $1c, $00, $00, $00
        dc $00, $41, $00, $f0, $02, $0c, $00, $00, $87, $00, $01, $f7, $df, $70, $41, $be
        dc $01, $04, $00, $00, $08, $30, $20, $c0, $00, $00, $06, $00, $18, $00, $00, $10
        dc $c0, $40, $0c, $00, $02, $0c, $00, $00, $82, $00, $00, $00, $00, $00, $41, $00
        dc $01, $0e, $00, $00, $08, $30, $20, $c0, $00, $01, $06, $04, $18, $00, $00, $30
        dc $c0, $02, $0c, $00, $02, $0c, $00, $01, $87, $00, $00, $00, $00, $00, $41, $80
        dc $03, $0c, $00, $00, $08, $30, $20, $c0, $00, $01, $06, $04, $18, $00, $00, $20
        dc $c0, $82, $0c, $00, $06, $1c, $00, $01, $06, $00, $00, $00, $00, $00, $03, $00
        dc $03, $0c, $00, $00, $18, $60, $61, $c0, $00, $03, $0e, $0c, $38, $00, $00, $30
        dc $c0, $c3, $0c, $00, $06, $18, $00, $01, $8e, $00, $00, $00, $00, $00, $c3, $00
        dc $3f, $fc, $00, $01, $ff, $e3, $ff, $80, $00, $1f, $fc, $7f, $f8, $00, $03, $ff
        dc $cf, $ff, $f8, $00, $7f, $f8, $00, $1f, $fe, $00, $00, $00, $00, $0f, $ff, $00
        dc $02, $18, $00, $00, $10, $60, $41, $00, $00, $03, $00, $08, $20, $80, $00, $61
        dc $80, $06, $18, $40, $06, $00, $00, $03, $08, $00, $00, $00, $00, $00, $82, $00
        dc $02, $18, $00, $00, $10, $40, $01, $00, $00, $83, $00, $08, $20, $82, $18, $61
        dc $80, $04, $10, $41, $06, $00, $10, $c2, $08, $20, $c0, $00, $00, $00, $02, $00
        dc $04, $18, $00, $00, $00, $60, $00, $08, $20, $83, $00, $08, $20, $86, $10, $41
        dc $80, $04, $10, $41, $06, $00, $30, $82, $08, $20, $c0, $00, $00, $01, $06, $00
        dc $04, $18, $00, $00, $00, $c0, $02, $08, $20, $83, $00, $08, $01, $04, $10, $41
        dc $80, $04, $10, $c2, $0e, $00, $20, $82, $08, $20, $c0, $00, $00, $01, $06, $00
        dc $ff, $f8, $00, $03, $ff, $c0, $3f, $ff, $ff, $ff, $01, $ff, $ff, $ff, $ff, $ff
        dc $80, $ff, $ff, $ff, $fc, $03, $ff, $ff, $ff, $ff, $80, $00, $00, $1f, $fe, $00
        dc $7f, $f8, $00, $01, $ff, $c0, $3f, $ff, $ff, $fe, $00, $ff, $ff, $ff, $ff, $ff
        dc $80, $7f, $ff, $ff, $fc, $01, $ff, $ff, $ff, $ff, $80, $00, $00, $1f, $fe, $00
        dc $3e, $f8, $00, $01, $f7, $c0, $1f, $7d, $ff, $be, $00, $7b, $ef, $fe, $fb, $ef
        dc $80, $3e, $fb, $df, $7c, $01, $f7, $df, $79, $ef, $80, $00, $00, $0f, $bc, $00
Essentially, DTMF uses two tones played at the same time to encode a digit.
To send the digit ‘1’, I need to play a 697Hz tone and 1209Hz.
The SID chip can play multiple tones at the same time, so this should be possible. However, the DTMF tones use sine waves, which the SID chip can’t generate. It can generate triangle waves which I think would be the closest equivalent.
The timing on the original SID was dependent on the frequency of the TV signal. In PAL regions this is 50Hz, and in NTSC regions this is 60Hz. I’m not sure which the SID-Ulator is using, so I had to generate values for the frequencies for both.
For PAL regions this is
f * 17.0284087
For NTSC regions this is
f * 16.4043888
So in the PAL region, the integer value of ‘f’ for 697 would be
697 * 17.0284087 = 11869
I calculated these values for both PAL and NTSC in Excel, along with the hex values. The hex values are easier to split into high and low bytes that are needed by the SID chip.
PAL
PAL (Hex)
NTSC
NTSC (Hex)
697
11868.80085
2E5C
11433.85897
2CA9
1209
20587.34609
506B
19832.90602
4D78
I then needed to actually play these notes, so I wrote a BASIC program to do this. I went with the NTSC values initially for the high and low bytes of the frequency.
Instead of using memory mapping like the Commodore 64, the SID-Ulator module uses Z80 IO ports. So rather than POKEing an address to configure the SID, we use the Z80 OUT command. The SID-Ulator is configured to use IO ports 212 for the register, and 213 for the data.
10 S=0 :REG=212 :DAT=213
20 REM CONFIGURE CHANNEL 1 (697 Hz)
30 OUT REG,S+1: OUT DAT, 0    : REM CLEAR FREQUENCY LOW BYTE
40 OUT REG,S: OUT DAT, 0      : REM CLEAR FREQUENCY HIGH BYTE
50 OUT REG,S+5: OUT DAT, 9    : REM SET ATTACK=0.6ms, DECAY=0.6s (9 = 00001001)
60 OUT REG,S+6: OUT DAT, 240  : REM SET SUSTAIN=MAX, RELEASE=6s (240 = 11110000)
70 OUT REG,S+4: OUT DAT, 17   : REM SET TRIANGLE WAVE (BIT 4) AND GATE (BIT 0)
80 OUT REG,S: OUT DAT, &ha9     : REM SET FREQUENCY LOW BYTE FOR 697
90 OUT REG,S+1: OUT DAT, &h2c   : REM SET FREQUENCY HIGH BYTE FOR 697
100 REM CONFIGURE CHANNEL 2 (1209 Hz)
110 OUT REG,S+8: OUT DAT, 0   : REM CLEAR FREQUENCY LOW BYTE
120 OUT REG,S+7: OUT DAT, 0   : REM CLEAR FREQUENCY HIGH BYTE
130 OUT REG,S+12: OUT DAT, 9  : REM SET ATTACK=0.6ms, DECAY=0.6s (9 = 00001001)
140 OUT REG,S+13: OUT DAT, 240: REM SET SUSTAIN=MAX, RELEASE=6s (240 = 11110000)
150 OUT REG,S+11: OUT DAT, 17 : REM SET TRIANGLE WAVE (BIT 4) AND GATE (BIT 0)
160 OUT REG,S+7: OUT DAT, &h78 : REM SET FREQUENCY LOW BYTE FOR 1209 Hz
170 OUT REG,S+8: OUT DAT, &h4d  : REM SET FREQUENCY HIGH BYTE FOR 1209 Hz
180 REM PLAY BOTH TONES FOR 1 SECOND
190 FOR T = 1 TO 1000 : REM LOOP FOR 1 SECOND (APPROXIMATELY)
200 NEXT T
210 REM RELEASE BOTH NOTES
220 OUT REG,S+4: OUT DAT, 16  : REM RELEASE CHANNEL 1 NOTE (CLEAR GATE BIT)
230 OUT REG,S+11: OUT DAT, 16 : REM RELEASE CHANNEL 2 NOTE (CLEAR GATE BIT)
240 END
Running this, I got something that certainly sounded like DTMF tones.
I tried plugging the output of the SID-Ulator into my DTMF decoder to confirm this was correct. Unfortunately, the DTMF decoder could not detect a valid tone.
I thought this must be because I needed to use the PAL values. Again, it certainly sounded like DTMF tones when run, but the DTMF decoder could not detect a valid tone.
Unfortunately, I’ve not been able to generate DTMF tones using the SID-Ulator.
What went wrong
I’m not sure what has gone wrong exactly, but I have a few ideas.
The calculations for the frequencies could be incorrect. I used the formula I found on the SID reference website. This may not be quite right. I don’t have a scope to check the frequencies that are being output.
The triangle wave isn’t a suitable replacement for the sine wave. There isn’t much I can do about this as the SID doesn’t support sine waves.
The output from the SID-Ulator isn’t suitable for my DTMF decoder. I don’t think this is the case as I can hear the tones when connected to my speaker.
I may also have just used incorrect values for the settings causing the output to distort.
If anyone has any suggestions, I’d love to hear them.
Now I want to go the opposite way, and have my RC2014 generate DTMF tones.
I own one of Ed Brindley’s excellent YM2149 Sound Cards for the RC2014, so I want to use this to generate the DTMF tones. Mine has Colin Piggot’s Quazar ZXTT card attached to match the clock speeds used in the ZX Spectrum. This gives a clock speed of 1.7734MHz, which will be important when generating the DTMF tones.
DTMF works by sending two tones for each key. One high frequency, one low frequency. These are mapped to the numbers 0 to 9, characters * and #, and the letters A to D.
1209 Hz
1336 Hz
1477 Hz
1633 Hz
697 Hz
1
1
3
A
770 Hz
4
5
6
B
852 Hz
7
8
9
C
941 Hz
*
0
#
D
The AY-3-8910 has 3 channels of sound available, so we only need two of these to generate a DTMF tone.
We need to calculate a divider for the based on the clock speed for each tone. This is the clockspeed divided by (16 x the frequency).
So for a 697Hz tone being generated with a clock speed of 1.7734Mhz, the calculation would be 1.7734 / ( 16 * 697) = 159.
We can do the same for the other tones, which gives us the following values.
697 Hz
159
770 Hz
144
852 Hz
130
941 Hz
118
1209 Hz
92
1336 Hz
83
1477 Hz
75
1633 Hz
68
We are going to use channels A and B on the AY-3-8910 to generate our DTMF tone. So to play the DTMF tone for “1”, we need to play a 697 Hz tone on channel A, and a 1209H Hz tone on channel B. Looking at the table above, this means channel A needs the value 159, and channel B the value 92.
A simple Z80 assembly language program to play these tones would look something like this.
AY_REGISTER_PORT EQU 0xD8
AY_DATA_PORT    EQU 0xD0

CHANNEL_A       EQU 0x00
CHANNEL_B       EQU 0x02

		ld a, CHANNEL_A
		out (AY_REGISTER_PORT), a
		ld a, 159
		out (AY_DATA_PORT), a

		ld a, CHANNEL_B
		out (AY_REGISTER_PORT), a
		ld a, 92
		out (AY_DATA_PORT), a
We can expand this and write a Z80 assembly language program to play the tones for each key once using the following code. In this example I keep the tone pairs in memory and then look up the values before playing them for a short duration then stopping the sound output before moving to the next pair.
		OUTPUT DTMFAYEncoder.z80

		ORG $9000

AY_REGISTER_PORT EQU 0xD8
AY_DATA_PORT    EQU 0xD0

CHANNEL_A       EQU 0x00
CHANNEL_B       EQU 0x02
ENABLE          EQU 0x07
AMPLITUDE_A     EQU 0x08
AMPLITUDE_B     EQU 0x09

VOLUME          EQU 0x0F

; the tones we need for the AY chip
DIVIDER_697     EQU 159
DIVIDER_770     EQU 144
DIVIDER_852     EQU 130
DIVIDER_941     EQU 118
DIVIDER_1209    EQU 92
DIVIDER_1336    EQU 83
DIVIDER_1477    EQU 75
DIVIDER_1633    EQU 68

init:
; set volume on channel A
		ld a, AMPLITUDE_A
		out (AY_REGISTER_PORT), a
		ld a, VOLUME
		out (AY_DATA_PORT), a

; set volume on channel B
		ld a, AMPLITUDE_B
		out (AY_REGISTER_PORT), a
		ld a, VOLUME
		out (AY_DATA_PORT), a


; iterate over all the codes we have and play them out
		ld b, tonecodelen
		ld hl, tonecodes
.loop:
		ld d, (hl)
		call playTone
		call enableAB
		call delay
		call stopTone
		call shortdelay

		inc hl
		djnz .loop

; stop the tones
		call stopTone

		ret


; -----------------------------
; SUBROUTINES
; -----------------------------

; a short delay
delay:
		push bc
		ld bc, $8888
		call dodelay
		pop bc
		ret

; an even shorter delay
shortdelay:
		push bc
		ld bc, $1500
		call dodelay
		pop bc
		ret

; dodelay does the actual delaying
; pass the delay length in BC
dodelay:
		push de
		push af
.loop:
		dec bc
		ld a, b
		or c
		jr nz, .loop
		pop af
		pop de
		ret

; enable channels A and B on the AY chip
enableAB:
		push af
		ld a, ENABLE
		out (AY_REGISTER_PORT), a
		ld a, 0xFC
		out (AY_DATA_PORT), a
		pop af
		ret

; stop tones playing on the AY chip
stopTone:
		push af
		ld a, ENABLE
		out (AY_REGISTER_PORT), a
		ld a, 0x3F 		        ; disable all channels
		out (AY_DATA_PORT), a
		pop af
		ret

; play a tone
; pass the ASCII character for the tone in D
playTone:
		push af
		push bc
		push de

		call getTone

		ld a, CHANNEL_A
		out (AY_REGISTER_PORT), a
		ld a, b
		out (AY_DATA_PORT), a

		ld a, CHANNEL_B
		out (AY_REGISTER_PORT), a
		ld a, c
		out (AY_DATA_PORT), a

		pop de
		pop bc
		pop af
		ret

; get the tones two tones for character in D
; return the two tones in registers BC
getTone:
		push af
		push hl

		ld e, 0

		ld hl, tonecodes
.loop:
		ld a, (hl)
		cp d
		jr z, .gottone
		inc hl
		inc e
		inc e
		jr .loop
.gottone:
		ld a, e
		ld hl, tones

; we now need to add A to HL
		add a, l
		ld l, a
		adc a, h
		sub l
		ld h, a
; get the first tone in B
		ld b, (hl)
		inc hl
; get the second tone in C
		ld c, (hl)

		pop hl
		pop af
		ret

; the tone codes in order. We use this to get
; the both tone codes from tones
tonecodes:	dc '1234567890*#ABCD'
tonecodelen     EQU $ - tonecodes

tones:
tone1:		dc DIVIDER_697, DIVIDER_1209            ; 1
tone2:		dc DIVIDER_697, DIVIDER_1336            ; 2
tone3:		dc DIVIDER_697, DIVIDER_1477            ; 3
tone4:		dc DIVIDER_770, DIVIDER_1209            ; 4
tone5:		dc DIVIDER_770, DIVIDER_1336            ; 5
tone6:		dc DIVIDER_770, DIVIDER_1477            ; 6
tone7:		dc DIVIDER_852, DIVIDER_1209            ; 7
tone8:		dc DIVIDER_852, DIVIDER_1336            ; 8
tone9:		dc DIVIDER_852, DIVIDER_1477            ; 9
tone0:		dc DIVIDER_941, DIVIDER_1336            ; 0
tonestar:	dc DIVIDER_941, DIVIDER_1209            ; *
tonehash:	dc DIVIDER_941, DIVIDER_1477            ; #
toneA:		dc DIVIDER_697, DIVIDER_1633            ; A
toneB:		dc DIVIDER_770, DIVIDER_1633            ; B
toneC:		dc DIVIDER_852, DIVIDER_1633            ; C
toneD:		dc DIVIDER_941, DIVIDER_1633            ; D
It’s easy to test our code as we build the DTMF decoder module. We can simply plug the output from the sound card into the DTMF decoder. We can see the decoded tones showing on the debugging LEDs.
To perform IO on the Z80 I needed to use a SFR (Special Function Register). When a variable created using an SFR is read or written to, this is converted directly into Z80 in and out instructions.
My DTMF Decoder module is running on an RC2014 Classic 2 on IO port 1. To declare an SFR in my C code to access this port, I can use the following…
Now when I read from variable io_dtmf, this is mapped to an in instruction on the Z80. So to read this port, I can do the following…
uint8_t in = io_dtmf;
Now the unsigned 8 bit integer variable “in” holds the value of whatever was on IO port 1 when the variable was assigned.
To write the decoder program, I can use the same approach as my earlier Z80 assembly language program. This reading the IO port, and seeing if the STQ bit is set. If it is, we can then read the input and map this to the known DTMF codes. This is then printed to the console. We also need to make sure we’ve not already handled the current tone, so we need to store and check against this.
This is my working C code to decode incoming DTMF tones using my DTMF Decoder module for the RC2014.
// zcc +rc2014 -subtype=basic -clib=sdcc_iy -v -m -SO3 --max-allocs-per-node200000 dtmf.c -o dtmf -create-app
// this will compile to $8000, so can be run in SCM using "g 8000"
#pragma output CRT_ORG_CODE = 0x8000
#pragma output REGISTER_SP = 0xFC00
#define __IO_DTMF_PORT  0x01
__sfr __at __IO_DTMF_PORT io_dtmf;
#include <stdio.h>
char *codes = "D1234567890*#ABC";
uint8_t previous = 0xff;
void main(void) {
printf("DTMF Decoder\n");
while (1) {
uint8_t in = io_dtmf;
// is the STQ bit set?
if (in & 0b00010000) {
// we only want the lower 4 bits so mask out any others.
uint8_t current = in & 0b00001111;
if (current != previous) {
printf("%c", codes[current]);
previous = current;
}
} else {
previous = 0xff;
}
}
}
Dual-tone multi-frequency, commonly known as DTMF, is a technology used in telecoms systems that uses audible tones to represent keys on a touch-tone phone.
You have probably heard this will navigating a menu on your phone, such as “Press 1 for …, Press 2 for….”, etc.
While browsing on AliExpressing for some parts for another project, it suggested I may like the MT8870 module (affiliate link). This is a small 5V DTMF decoder module with digital outputs. I thought this would be ideal for an RC2014 project.
We’re interested in 7 pins on this module. +5v and GND are for powering the module. STQ, D0, D1, D2, and D3 are for the decoded tones. The STQ line goes high when a decoded tone is present. The actual code is a 4 bit value stored on D0, D1, D2, and D3.
We can pass this output to a 74HCT245 transceiver which we can enable using a 74HCT688 to decode an input address on the RC2014, along with a 74HCT32 to check the RD and IORQ lines.
I’m using an RC2014 Classic 2 for this project, so inout port 1 is free, but I know this isn’t necessarily the case on more advanced RC2014s. Because of this I’ve put an 8 inline switch module on the 74HCT688 so I change the address if necessary.
I am also adding some LEDs on the input lines so I can see the incoming data visually. The MT8870 has some SMD LEDs on board to do this, but the built-in pin headers I want to use will mean these face the RC2014 module PCB and so won’t be visible. I’ve gone for green for the STQ line, blue for the data lines.
The PCB looks like this.
Decoding the input using Z80 assembly language
I want to write a small Z80 assembly language program to print out any incoming DTMF tones to the terminal.
I’m using the SCM monitor program on my RC2014 Classic 2 computer to load and execute my assembly language program. This gives a handy print character to the terminal routine I can use. I pass the ASCII character I want to print in register A, the value $02 in register C, and execute RST $30. I can wrap this into my own subroutine called printchar. This gives me the flexibility to swap to another output method such as an LCD screen in future.
; pass the character to print in register A
; This uses SCM to print back to the terminal.
printchar:
		push bc
		ld c, $02 	; SCM API function $02 - print character
		rst $30
		pop bc
		ret
I will need to debounce any input I read from the decoder module. This is because the value will be present for longer than the first read I make. To do this I will need to check if STQ is high and compare this to the last value read. If it’s the same, I know I have already handled this value. However, when STQ goes low, I need to reset the last value read to a dummy value else it won’t detect multiple presses of the same button.
Once I have the data, I can map it to the correct character. I do this by having the valid decoded characters in order, and then simply the incoming character value as an offset to this list.
My final code looks like this.
		OUTPUT DTMFDecoder.z80

		ORG $9000

; Input data from the DTMF encoder is
; Bits 0-3 = number data (D0, D1, D2, D3)
; Bit 4    = new data flag (STQ)
; Bits 5-7 = unused.

; The input port where we can find the DTMF decoder
DTMFDecoder     EQU 1

; masks for handling the input data.
NEW_INPUT_MASK  EQU %00010000
DATA_INPUT_MASK EQU %00001111

; Flags to show if the data is new or not.
DataRead        EQU $FF
DataClear       EQU $00

; Register C holds the data read flag. This is set to DataRead when we've
; read a byte, and set to DataClear when we are safe to read a byte.
		ld c, DataClear

mainloop:
; read the data from the input port DTMFDecoder and store this in register B.
		in a, (DTMFDecoder)
		ld b, a
; see if the new data flag bit has been set. If it has go to datapresent.
		and NEW_INPUT_MASK
		jr nz, datapresent

; clear Register C as we have no data to read, and loop again.
		ld c, DataClear
		jr mainloop

datapresent:
; we have data present so check if register C is set to DataRead. If it
; is we know we have already handled that input so can loop again.
		ld a, DataRead
		cp c
		jr z, mainloop

; set register C to DataRead to flag we have handled this input.
		ld c, DataRead

; get the input into register A and mask out the button press bit.
		ld a, b
		and DATA_INPUT_MASK

; decode the character from the input and find it in the charmap.
		ld hl, charmap

; add the value of a to hl
		add a, l
		ld l, a
		adc a, h
		sub l
		ld h, a

; get the character from the charmap and print it.
		ld a, (hl)
		call printchar

; now loop again.
		jr mainloop


; pass the character to print in register A
; This uses SCM to print back to the terminal.
printchar:
		push bc
		ld c, $02 	; SCM API function $02 - print character
		rst $30
		pop bc
		ret

; The DTMF characters in order.
charmap:
		db 'D1234567890*#ABC'
Cookie Consent
We use cookies to improve your experience on our site. By using our site, you consent to cookies.
Websites store cookies to enhance functionality and personalise your experience. You can manage your preferences, but blocking some cookies may impact site performance and services.
Essential cookies enable basic functions and are necessary for the proper function of the website.
Name
Description
Duration
Cookie Preferences
This cookie is used to store the user's cookie consent preferences.
30 days
Statistics cookies collect information anonymously. This information helps us understand how visitors use our website.
Google Analytics is a powerful tool that tracks and analyzes website traffic for informed marketing decisions.
Contains information related to marketing campaigns of the user. These are shared with Google AdWords / Google Ads when the Google Ads and Google Analytics accounts are linked together.
90 days
__utma
ID used to identify users and sessions
2 years after last activity
__utmt
Used to monitor number of Google Analytics server requests
10 minutes
__utmb
Used to distinguish new sessions and visits. This cookie is set when the GA.js javascript library is loaded and there is no existing __utmb cookie. The cookie is updated every time data is sent to the Google Analytics server.
30 minutes after last activity
__utmc
Used only with old Urchin versions of Google Analytics and not with GA.js. Was used to distinguish between new sessions and visits at the end of a session.
End of session (browser)
__utmz
Contains information about the traffic source or campaign that directed user to the website. The cookie is set when the GA.js javascript is loaded and updated when data is sent to the Google Anaytics server
6 months after last activity
__utmv
Contains custom information set by the web developer via the _setCustomVar method in Google Analytics. This cookie is updated every time new data is sent to the Google Analytics server.
2 years after last activity
__utmx
Used to determine whether a user is included in an A / B or Multivariate test.
18 months
_ga
ID used to identify users
2 years
_gali
Used by Google Analytics to determine which links on a page are being clicked
30 seconds
_ga_
ID used to identify users
2 years
_gid
ID used to identify users for 24 hours after last activity
24 hours
_gat
Used to monitor number of Google Analytics server requests when using Google Tag Manager
1 minute
Marketing cookies are used to follow visitors to websites. The intention is to show ads that are relevant and engaging to the individual user.
A video-sharing platform for users to upload, view, and share videos across various genres and topics.
Registers a unique ID on mobile devices to enable tracking based on geographical GPS location.
1 day
VISITOR_INFO1_LIVE
Tries to estimate the users' bandwidth on pages with integrated YouTube videos. Also used for marketing
179 days
PREF
This cookie stores your preferences and other information, in particular preferred language, how many search results you wish to be shown on your page, and whether or not you wish to have Google’s SafeSearch filter turned on.
10 years from set/ update
YSC
Registers a unique ID to keep statistics of what videos from YouTube the user has seen.
Session
DEVICE_INFO
Used to detect if the visitor has accepted the marketing category in the cookie banner. This cookie is necessary for GDPR-compliance of the website.
179 days
LOGIN_INFO
This cookie is used to play YouTube videos embedded on the website.
2 years
VISITOR_PRIVACY_METADATA
Youtube visitor privacy metadata cookie
180 days
You can find more information in our Cookie Policy and .