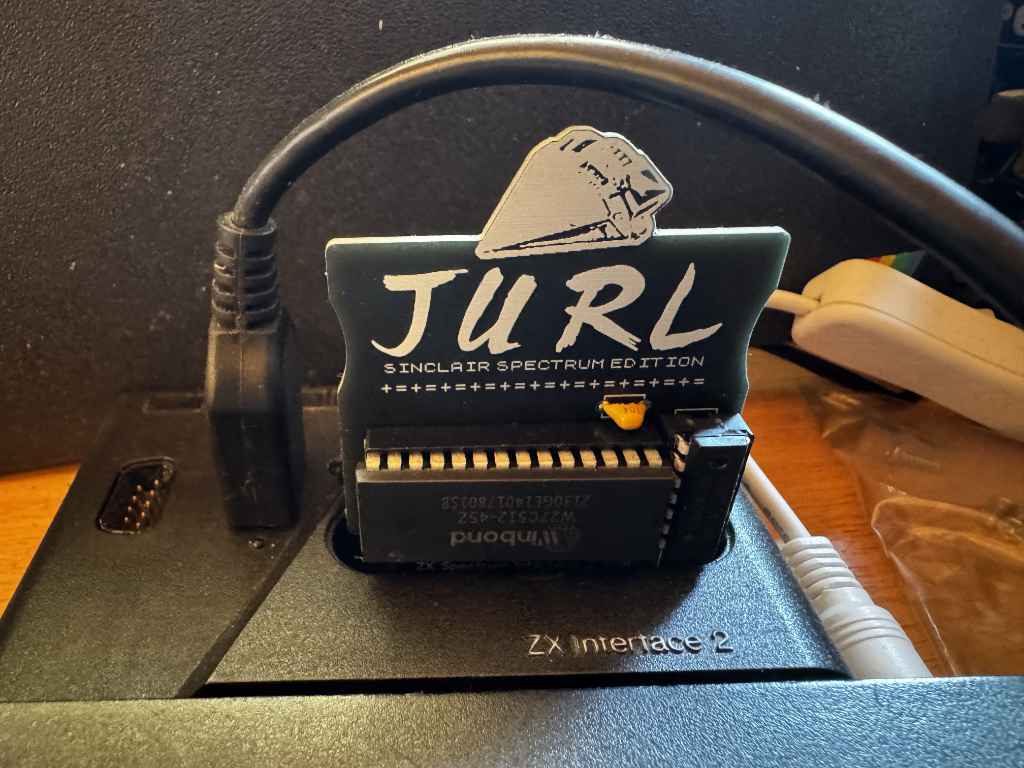
Making a Jurl ROM Cartridge for the ZX Spectrum

If you are interested in Retro Computing, then you have probably come across Johnny Blanchard and his quest to port his game Jurl to as many platforms as possible.

One of those platforms is the Sinclair ZX Spectrum. You can name your price to download a copy of Jurl for the ZX Spectrum.

I’ve recently become interested in how ROM cartridges work on the ZX Spectrum. They were initially introduced by Sinclair Research with the release of the ZX Interface 2. This was a joystick interface that supported two Atari style 9 pin joysticks, and included a slot for a ROM cartridge. When a ROM cartridge was inserted and the Spectrum powered up, the internal ROM in the Spectrum would be disabled and replaced with the ROM in the cartridge. This meant games or other code on the cartridge would run instantly without needing to be loaded from cassette. However, it also meant games could not rely on any routines in Spectrum ROM, and must be standalone. The ROM cartridge is 16 kilobytes in size.

Looking at Jurl, the binary is 27,353 bytes in size. This is larger than the 16k size limit of the ROM cartridge. However, we can use compression to squeeze Jurl so it fits into a 16k cartridge. If we use ZX0 compression, we can shrink Jurl down to just 11,598 bytes.

Let’s start to put our ROM code together.

The code on the ROM will always start to execute from address 0. We can’t be sure the contents of the RAM will be blank. We could zero all the contents of the RAM, but it would be quicker to just make sure the BORDER, PAPER, and INK are all set to black so the user doesn’t see anything they shouldn’t.

The border is set using a Z80 out instruction to port 254. The paper and ink can be setting the attribute area of the screen memory to 0. This starts at address $5800 and is 767 bytes long. We can use a Z80 ldir instruction to quickly clear this.

; first, set the border to black
    ld a,0
    out (254),a           ; border black

; now set the background paper and ink to black by filling the attribute
; memory with 0s. 
    ld hl,$5800           ; attribute memory start
    ld de,$5801           
    ld bc,767
    ld (hl),a
    ldir                  ; fill all 768 attributes

Now we have a black screen, we can decompress the game and start it. We set the location of the compressed game in the HL register pair, and the destination address in DE before we call the ZX0 decompression routine. Once the game has decompressed we can just call it. We add a jump back to the call instruction incase the game returns. This ensures the game will just restart.

 ; decompress the game code into memory at gamelocation.
    ld hl,jurldata
    ld de,gamelocation 
    call dzx0_standard

; run the game code.
.game_loop:
    call gamelocation

    jp .game_loop

Remember I said that the Spectrum’s ROM was replaced by the contents of the cartridge? Well, this causes a couple of problems as Jurl is expecting two things to be available in specific locations in the ROM. For the game to work, we will need to fix this.

Firstly, Jurl expects the Z80 to be running in IM1. This is interrupt mode 1 which means the Z80 will be interrupted periodically and will execute code at address $38. This would normally handle things like reading the keyboard, but Jurl doesn’t actually do anything with the data the interrupt is handling. This means we just need to handle the interrupt and return. So at address $38 we add the following.

im1:
    ei     ; re-enable interrupts
    reti   ; return

Secondly, Jurl also expects the ZX Spectrum’s font be available at address $3D00. I used the memory dump option in the Fuse emulator to save the font from the Spectrum’s ROM. I can then just include this binary data into my ROM at the correct address.

Once the source code has been assembled, the ROM cartridge binary can be tested in Fuse using the Media -> Cartridge menu option.

Building a physical ROM cartridge

Now I have a working binary, I can create a physical ROM cartridge to use in my ZX Interface 2.

The ROM cartridge slot exposes address and data lines, as well as MREQ. I have several W27C512 EEPROMs I can use in the cartridge. This is a 64k cartridge but as I only need 16k, I can tie lines A14 and A15 to ground. I can also use a 74HCT32 OR gate to enable the EEPROM when A14, A15, and MREQ are all low.
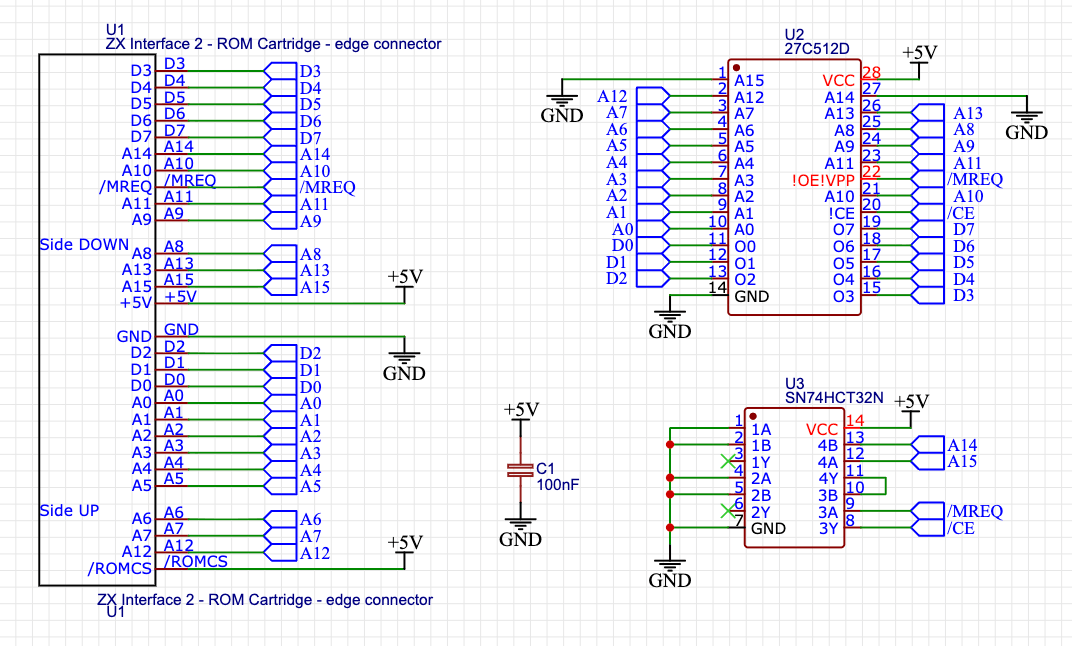
Now I have a circuit, I can use this to create a PCB. I have used EasyEDA to layout the PCB and also include a graphic of the spaceship from the loading screen.
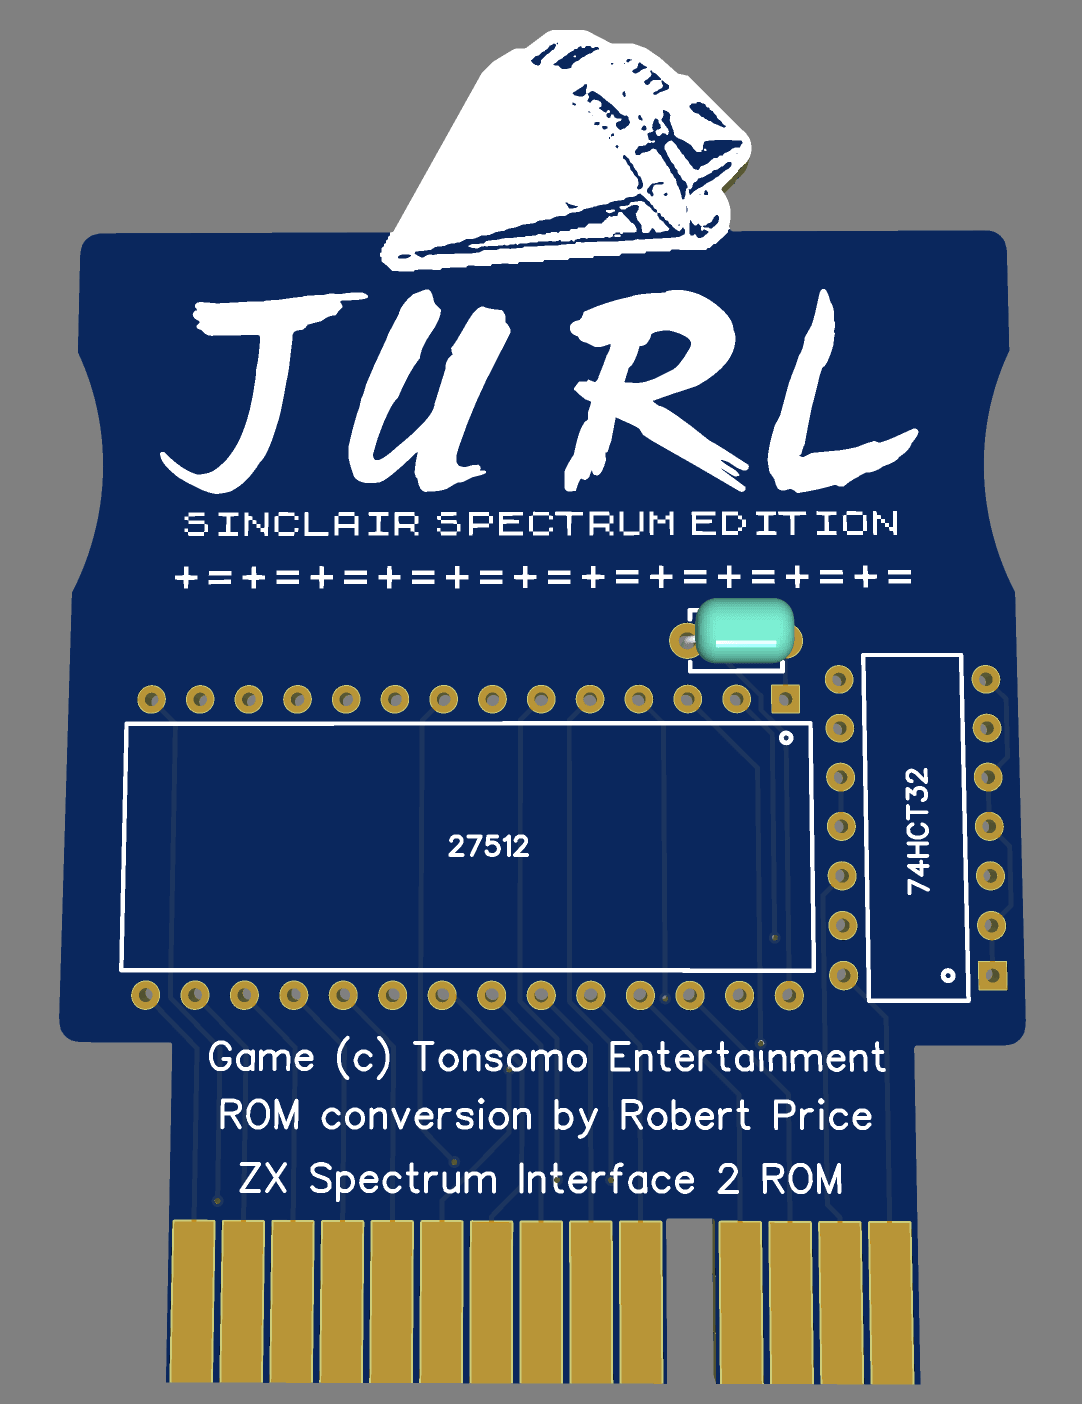
I sent the PCB design off to be manufactured, and when the boards arrived in the post I soldered one up and tested it out.
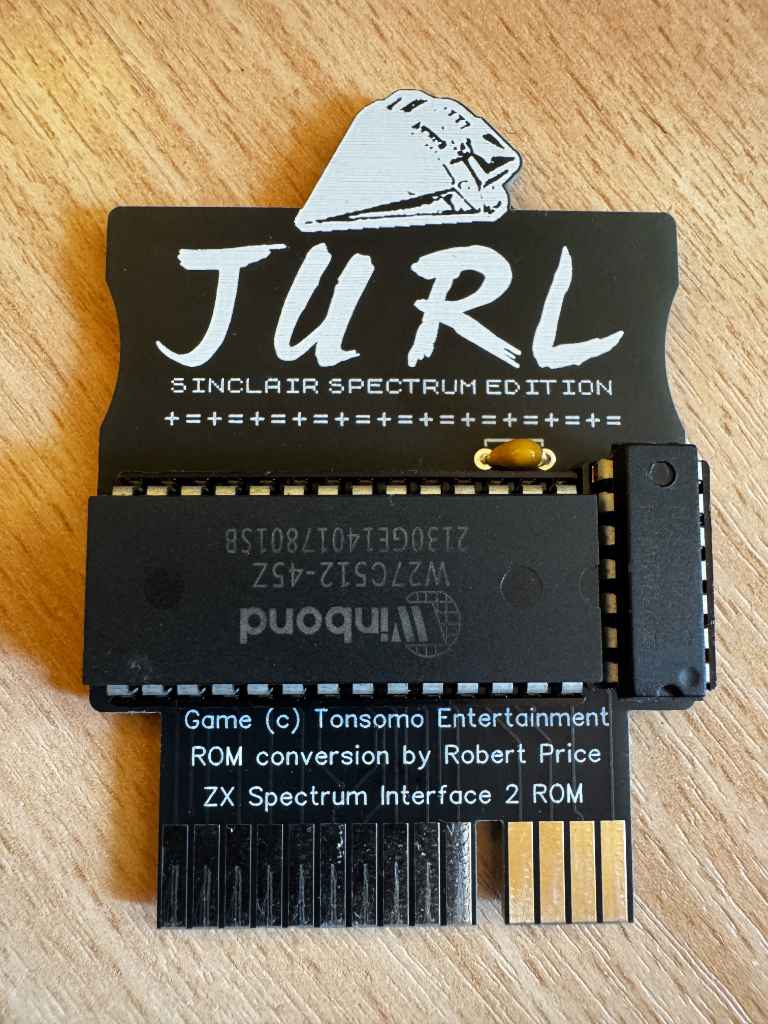
The card works well, and I now can play Jurl on my 48k ZX Spectrum instantly.

Acknowledgements

Before sharing this project, I wrote to Johnny to get his approval as the game is under copyright. I am very grateful that he kindly gave permission for me to share this.

RC2025 – Part 8 – Playing Manic Miner with an NES controller

I’ve made good progress with my RetroChallenge to get an NES controller working on my RC2014 computer.

I wanted to be able to play a game with the controller. I had hoped to write my own, but with only a few days left, I didn’t think this was practical. Instead, I wondered about hacking an existing game.

While it’s not an RC2014, the Sinclair ZX Spectrum is also based on the Z80 processor. Colin Piggot makes a ZX Spectrum Bus Interface that allows RC2014 cards to be plugged into a Speccy.

As the RC2014 NES controller module can now be plugged into a Speccy, could I adapt one of my favourite games to work with it? Could Manic Miner be playable with an NES controller?

The Manic Miner intro screen.

The first step was to try to disassemble Manic Miner to see how the existing Kempston joystick support worked. I was hoping it would be simple to just wire in NES controller support there.

I made a start on this myself, before thinking that for such an iconic game, someone must have done this before. A quick search revealed an excellent commented disassembly of Manic Miner by Richard Dymond.

Faking a Kempston joystick

The Kempston joystick interface works by using a Z80 in operation on port 31. I would need to fake this by calling a routine to read the NES controller and return data in the Kempston format.

The Kempston joysticker interface returns the following in a single byte.

BitValue
0Right
1Left
2Down
3Up
4Fire
5N/A
6N/A
7N/A

So, if the Fire button is being pressed, bit 4 will be 1.

I can modify the get_buttons routine I previously wrote to read the NES controller and return the data in this format.

To do this, before the pop bc instruction, I can add the following code.

; build the kempston joystick byte in register a
        xor a               ; clear a
        
.test_fire:
        bit NES_A_BTN, c
        jr nz, .test_up
        set 4, a
.test_up:
        bit NES_UP_BTN, c
        jr nz, .test_down
        set 3, a
.test_down:
        bit NES_DOWN_BTN, c
        jr nz, .test_left
        set 2, a
.test_left:
        bit NES_LEFT_BTN, c
        jr nz, .test_right
        set 1, a
.test_right:
        bit NES_RIGHT_BTN, c
        jr nz, .done
        set 0, a
.done:
        pop bc              ; restore bc registers

Here I am clearing the a register so all bits have a default value of 0. Next, I am testing the bits in the byte I built to store the values from the NES controller. If the bits are set in the NES byte, then I set the relevant bit in the Kempston byte.

Hacking Manic Miner

My original idea was to load Manic Miner into a Spectrum, then use a Multiface to poke my changes into memory. Although this would work, I decided it would take too long and would be harder to save my work.

Instead, I downloaded a clean .tap file of Manic Miner from World of Spectrum and loaded this into the ZEsarUX emulator. ZEsarUX will let me poke my changes into the game and save the results as an SNA file. I can use the SNA file on a DivMMC connected to my Spectrum to load the game. This means I can make sure the game is still working before saving my changes.

I needed to find a place to store my get_buttons routine in Manic Miner. Upon examining the disassembly, remnants of the source code from when Matthew Smith was writing the game are visible at 0x934c. This space is unused in the game, so it’s safe for me to put my code there.

; A simple button reading program for the RC2014 Z80 computer running SCM
; This will pretend to be a Kempston joystick interface, and return bits like that interface.
; Robert Price - 24th October 2025

        ORG $934c

; The Z80 port address to use for the controller interface.
NES_PORT    EQU $01

; The bit masks for the controller interface lines.
CLOCK   EQU $01
LATCH   EQU $02
DATA    EQU $01

NES_A_BTN      EQU $00
NES_UP_BTN     EQU $04
NES_DOWN_BTN   EQU $05
NES_LEFT_BTN   EQU $06
NES_RIGHT_BTN  EQU $07


; subroutine to read the NES controller button states.
; returns the button states in register a.
; all other registers are preserved.
get_buttons:
        push bc           ; save bc registers

; pulse the LATCH line low to high and back to low again.
        xor a               ; set a to 0 
        out (NES_PORT), a
        ld a, LATCH
        out (NES_PORT), a
        xor a               ; set a to 0
        out (NES_PORT), a

; setup the loop counter to read 8 buttons.
        ld b, 8             ; 8 buttons to read. This will be decremented to 0.

; now we rebuild the byte into register c. As we are setting all 8 bits,
; we don't need to worry about clearing c first.
.loop:
; read the controller button states
        in a, (NES_PORT)    ; read the DATA line

; move the DATA bit into register c to rebuild the send byte
        srl a               ; shift right to get the DATA bit into carry
        rr c                ; rotate carry into bit 7 of c

; pulse the CLOCK line to read the next button.
        ld a, CLOCK
        out (NES_PORT), a
        xor a               ; set a to 0
        out (NES_PORT), a

; loop 8 times to read all buttons.
        djnz .loop

; build the kempston joystick byte in register a
        xor a               ; clear a
        
.test_fire:
        bit NES_A_BTN, c
        jr nz, .test_up
        set 4, a
.test_up:
        bit NES_UP_BTN, c
        jr nz, .test_down
        set 3, a
.test_down:
        bit NES_DOWN_BTN, c
        jr nz, .test_left
        set 2, a
.test_left:
        bit NES_LEFT_BTN, c
        jr nz, .test_right
        set 1, a
.test_right:
        bit NES_RIGHT_BTN, c
        jr nz, .done
        set 0, a
.done:
        pop bc              ; restore bc registers

        ret                 ; return to caller with button states in a

I compiled the code using the sjasmplus assembler on my Mac, and this gave me a 61-byte block of assembled code. Running this through hexdump gave me the following hex code to poke into memory.

9c4c  c5 af d3 01 3e 02 d3 01  af d3 01 06 08 db 01 cb
9c5c  3f cb 19 3e 01 d3 01 af  d3 01 10 f1 af cb 41 20
9c6c  02 cb e7 cb 61 20 02 cb  df cb 69 20 02 cb d7 cb
9c7c  71 20 02 cb cf cb 79 20  02 cb c7 c1 c9

I used the Hexadecimal Editor in the Debug Menu of ZEsarUX to input this.

Now I needed to call this when the Kempston joystick was being called from the game.

The first place this is done is at address 0x8878. This code checks if the fire button is being pressed in demo mode.

8878	LD A,($8459)	Pick up the Kempston joystick indicator from 8459
887B	OR A	        Is there a joystick connected?
887C	JR Z,$8884	Jump if not
887E	IN A,($1F)	Collect input from the joystick

In this case, I don’t need to check the joystick indicator, so all 4 instructions can be replaced with the following.

8878    CALL $934C
887B    NOP
887C    NOP
887D    NOP
887E    NOP
887F    NOP

The NOP instructions tell the Z80 to do nothing. I am just using them to fill up the space that the 4 original instructions were using. The assembled code looks like this, and it was loaded using the hexadecimal editor.

8878  cd 4c 93 00 00 00 00 00

The next block of code looks for left or right being pressed at address 0x8C24

8C24	LD A,($8459)	Collect the Kempston joystick indicator from 8459
8C27	OR A	        Is the joystick connected?
8C28	JR Z,$8C34	Jump if not
8C2A	LD BC,$001F	Collect input from the joystick
8C2D	IN A,(C)

I can use the same code as before to drop in there, but I need an extra 3 NOP instructions to fill up the space. The replacement hex code looks like this.

8C24  cd 4c 93 00 00 00 00 00 00 00 00

There is similar code to check the fire button at address 0x8c6c. I can poke in the same hex code there.

8C6C  cd 4c 93 00 00 00 00 00 00 00 00

Finally, there is a routine at 0x9337 that checks if the fire button is being pressed. This is a shorter version like the code at 0x8878, so I can poke in the same code there.

9337  cd 4c 93 00 00 00 00 00

I can now save a snapshot of the game. I do this using the Snapshot option in ZEsarUX and making sure I use a .SNA file extension. I called my file MMNES.SNA. It’s available to download for anyone following along.

Copying this to an SD card and placing it in the DivMMC allowed me to load the modified game on my Spectrum.

A screenshot of Manic Miner's first level - The Central Cavern

Conclusion

While I hadn’t planned to hack a Spectrum game as part of the RetroChallenge this year, it’s turned out to be a great diversion and learning experience. It’s still using the code and hardware developed on the RC2014.

The joypad works well, and although it is using a little more CPU time, it’s not noticeable when playing the game. It doesn’t have the nostalgia value of using the Spectrum’s rubber keys, but it is responsive and comfortable to use.

The NES Controller module connected to a Spectrum with the Quazar bus interface.